안녕하세요 소진입니다 ㅎㅎ
이번에는 SwiftUI를 이용해서 Table View를 만들어 보도록하겠습니다 :)
다른 방법으로 TableView 만들어보려면!
[UI] Code base로 Table View 만들기
[UI] Story board로 Table View 만들기
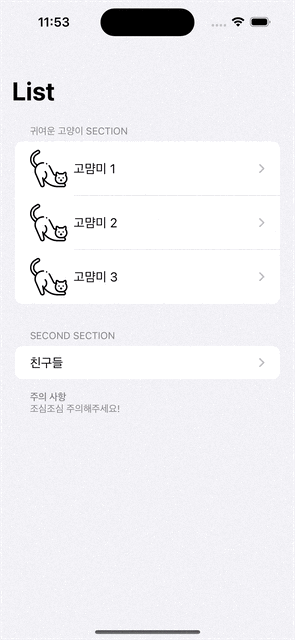
미리 보기
Cell Row Custom 하기
우선 고양이 cell 부터 만들어보겠습니다!!

전에 했던 것이랑 동일하게 Custom 했습니다 ㅎㅎ
우선,
코드를 함께 보시죠!!
struct CustomCat: View {
    var cellNum: Int

    var body: some View {
        HStack {
            NavigationLink(destination: DetailView()) {
                Image("cat")
                    .resizable()
                    .frame(width: 50, height: 50)
                Text("고먐미 \(cellNum)")

                Spacer()
            }
        }

    }

}
저희는 수평(가로)로 이미지와 텍스트를 보여주고 싶기때문에
수평 배치인 HStack을 사용하겠습니다.
SwiftUI의 Container View를 모른다면
[SwiftUI] Container View 글을 참고해주세요!
NavigationLink는 Cell을 클릭 후 내부로 들어갔을 때 보여줄 View를 설정하는 곳이에요!
destination(목적지)에 해당 View를 만들어 놓은 struct를 선언하면
Cell을 눌렀을때 해당 View가 띄워집니다!
struct DetailView: View {
    var body: some View {
        Image("detailCat")
            .resizable()
    }
}
위 코드가 Cell을 클릭했을 때 나오는 View를 구성한 부분입니다!
아래 이미지와 같이 보입니다

그 후, cell의 이미지와 텍스트를 설정해주어야겠죠???
Image는 제가 미리 Assets에 넣어놔서 해당 파일 이름을 적어주었습니다.
.resizable은 이미지를 View에 맞춰주는 역할을 하고,
.frame으로 이미지를 50x50으로 지정해주겠습니다!!
Text는 간단하게 적어주면 완성!
List Header와 Footer
List Section에는 header과 footer가 있는데
각각의 위치는 아래 이미지와 같습니다!

우선 Footer부분에 보여지고 싶은 View를 구성 해줍니다.
struct FooterView: View {
    var body: some View {
        VStack(alignment: .leading) {
            Text("주의 사항")
                .bold()
            Text("조심조심 주의해주세요!")
        }.padding(.top,10.0)
    }
}
Section 을 통해서 적용할 수 있는데,
header, footer 단독으로도 사용할 수 있습니다!
struct ContentView: View {
    var body: some View {
        NavigationView {
            List {
                Section(header: Text("귀여운 고양이 Section")) {
                    CustomCat(cellNum: 1)
                    CustomCat(cellNum: 2)
                    CustomCat(cellNum: 3)
                }
                Section(header: Text("Second section"),
                        footer: FooterView()) {
                    NavigationLink(destination: ArratList()) {
                        Text("친구들")
                    }
                }
            }
            .listStyle(.insetGrouped)
            .navigationTitle("List")

        }
    }
}
위 코드 처럼 값은 Text 문구로 해도되고,
struct를 만들어 선언해주어도됩니다.
Cell 삭제 및 이동 구현
우선, Delete와 Move를 하는 함수를 만들어두겠습니다.
func didDeleteCell(at offsets: IndexSet) {
    items.remove(atOffsets: offsets)
    print("Deleted cell is \(offsets)")
}

func didMoveCell(from sorce: IndexSet, to destination: Int){
items.move(fromOffsets: sorce, toOffset: destination)
}
함수를 만든 후,
아래 코드처럼 .onDelete와 .onMove에 적용해주면 끝!
아주 쉽죠?
var body: some View {
        List {
            ForEach(items) { item in
                Text(item.name)
            }
            .onDelete(perform: didDeleteCell)
            .onMove(perform: didMoveCell)
        }
        .listStyle(.insetGrouped)
        .navigationBarItems(trailing: EditButton())
}
따라오느라 고생 많으셨습니다!
전체 코드는 아래 Git 링크로 첨부하도록 하겠습니다 ㅎㅎ
틀리거나 부족한 부분에 대해서는 댓글로 알려주시면 아주아주 감사합니다!
'iOS 개발 > UI' 카테고리의 다른 글
| [UI] UIView 원하는 모서리만 둥글게 만들기 (CornerRadius) (0) | 2023.09.05 |
|---|---|
| [SwiftUI] Property Wrapper - @Published, @ObservedObject, @StateObject, @EnvironmentObjec (1) | 2023.01.03 |
| [SwiftUI] Property Wrapper - @State, @Binding (4) | 2023.01.02 |
| [SwiftUI] Container View (1) | 2023.01.02 |
| [UI] xib로 Table View 만들기 (2) | 2023.01.02 |

